Run Claude Code on Cheap OpenRouter Models: A Start-to-Finish Debian Guide

This guide builds an always-on Claude Code environment on a fresh Debian host that runs entirely against cheap pay-per-use models from OpenRouter, instead of Anthropic’s own models. You get the full Claude Code experience (the agent, tool use, file edits, multi-turn coding) but every request is served by a model that costs a fraction of Sonnet or Opus. You also get three cost tiers you can switch between mid-session, and an automatic failover mesh so that if one model has an outage, requests cascade to another without interrupting you.
The result is a coding agent that, in practice, runs at roughly 15 percent of the cost of the equivalent Anthropic models, using models that are strong at programming. There is no local GPU and no LM Studio. Everything goes through one OpenRouter account.
Throughout this guide, values in square brackets like [SERVICE_USER] are placeholders. Replace each one, including the brackets, with your real value before running a command.
What you will end up with
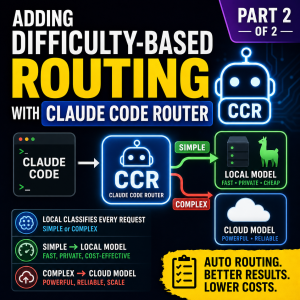
Claude Code points at a small router called CCR (Claude Code Router). CCR forwards every request to a LiteLLM gateway running in a container. LiteLLM holds your three OpenRouter models and the failover logic, then talks to OpenRouter, which serves the actual model. You launch a coding session with a shell command, and you switch cost tiers inside the session with a model command. One tier is the default; the others are one command away.
The three tiers, cheapest to most expensive, are a budget model, a mid model, and a top model. This guide makes the top model the default, because even the top tier is far cheaper than Anthropic’s models, so defaulting to the best-quality OpenRouter model still saves the large majority of what you would otherwise spend, while the cheaper tiers let you push the savings further on routine work. You can change which tier is the default if you prefer; the guide shows where.
Why this shape, and why it changed
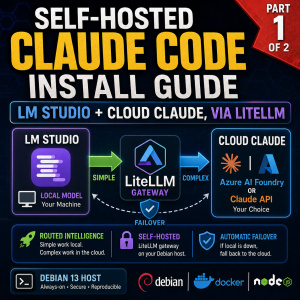
An earlier version of this project tried to run a local model on a home GPU for simple tasks and only reach for the cloud on hard ones, with a classifier deciding per request. That works, but the local model hallucinated too much to be useful once a task spanned more than a single file, and maintaining the local server, the classifier, and the GPU added a lot of moving parts. The setup here drops all of that. Cloud models on OpenRouter are cheap enough that paying per request for a genuinely capable model beats fighting a weak local one. The architecture is simpler as a result: one gateway, three models, manual switching.
CCR is kept in the design even though it no longer makes routing decisions. It serves a quieter but real purpose: it translates Claude Code’s Anthropic-style requests into the OpenAI-style format that LiteLLM and OpenRouter expect, and it gives you a stable local endpoint and a clean way to switch models with a command. Removing it is possible but would push Claude Code’s traffic onto a request format with known rough edges, so this guide keeps it.
Architecture at a glance
Claude Code (host)
   -> CCR            (host Node process, port 3456, systemd service)
      -> LiteLLM     (Docker container, 127.0.0.1:4000)
         -> OpenRouter  (serves the three models)
CCR runs as a host process, not in a container. LiteLLM runs in a container. They both live in the home directory of an unprivileged service user and need no root to run once installed.
What you need before starting
An always-on Debian 13 host (a VM or a dedicated machine) with roughly 2 to 4 vCPU, 8 GB RAM, and 40 GB disk. This setup is light because no model runs on the host; the host only runs the router and the gateway, both of which are thin.
An OpenRouter account with credits and an API key. The key begins with a recognizable OpenRouter prefix. Add a small amount of credit to start; a few dollars covers a great deal of testing.
A client PC with an SSH client to connect to the host.
This guide assumes the Debian host already exists and is reachable on your network. Host provisioning, meaning hypervisor or VM creation, is out of scope so the focus stays on Claude Code.
Prefer to skip the manual steps?
This whole setup is also available as an interactive install script that does everything below for you. Run it as your service user on the host and it prompts for the handful of values unique to your environment, your three models and their names, your OpenRouter key, and which tier to make the default, showing an example for each and validating your answers before it uses them. From there it installs the toolchain and the router if they are missing, writes your secrets file and both config files, starts the gateway, tests every model through OpenRouter, sets the router up as a service that survives crashes and restarts, and adds the launcher commands to your shell. Every step that changes your system asks for confirmation first, every file it touches is backed up beforehand, and it is safe to re-run. If your setup differs from the one described here, or you would rather understand each piece as you go, ignore the script and follow the manual phases below instead; the script simply performs those same steps for you.
You can download the install script here: Discount Claude Code – Script
The three models this guide uses
OpenRouter carries hundreds of models. This guide is built around three specific picks, chosen as cost tiers from cheapest to most expensive: a cheap fast model for the budget tier, a mid-priced agentic model for the middle tier, and a flagship for the top tier. The commands and configs below use these exact models, so you can follow along start to finish without deciding anything. If you would rather use your own models, you can swap them in at any point; the section after the picks explains how, and nothing else in the guide changes beyond the names and slugs you substitute.
The prices below are per million tokens, input then output, at the time of writing; check each model’s live OpenRouter page for current numbers, since pricing moves. The short names in parentheses (deepseek-flash, mimo, qwen-max) are the friendly names this guide gives each tier inside the gateway, and they are what you type to switch models in a session.
The budget tier (deepseek-flash) is DeepSeek V4 Flash, slug deepseek/deepseek-v4-flash, at roughly 0.10 dollars in and 0.20 dollars out per million tokens. It was chosen as the cheap tier because it is a genuinely strong coding model rather than a weak fallback. It is a Mixture-of-Experts model with a one-million-token context window, it supports graded reasoning effort up to a maximum setting, and on the independent intelligence index it has scored comparably to a mid-tier frontier model while costing a tiny fraction as much. In other words, it is cheap enough to run all day yet capable enough that dropping to it for routine work costs you little in quality. This guide runs it with maximum reasoning enabled, which is why it carries a different parameter handling than the other two. It is the tier to switch down to when you want to minimize cost on a stretch of routine work.
The mid tier (mimo) is Xiaomi MiMo-V2.5-Pro, slug xiaomi/mimo-v2.5-pro, at roughly 0.435 dollars in and 0.87 dollars out per million tokens. It was chosen as the middle step because it is an agent-focused model with strong results on software-engineering benchmarks and a one-million-token context, sitting at a sensible price point between the budget and top tiers. It gives you a meaningful quality step up from the budget model without jumping to flagship pricing, which is exactly what a middle tier is for.
The top tier (qwen-max) is Qwen3.7-Max, slug qwen/qwen3.7-max, at roughly 1.25 dollars in and 3.75 dollars out per million tokens. It was chosen as the quality ceiling, and it is the tier this guide sets as the default, because it is a flagship-class model tuned for agentic coding and long-horizon execution, with a one-million-token context. It is the most expensive of the three, but it is still far below the cost of the comparable Anthropic models, so even defaulting to this tier saves the large majority of what you would otherwise spend. Defaulting to the best model means your everyday sessions get top quality automatically, and you drop to a cheaper tier by hand only when you want to economize on routine work. That is the arrangement this guide recommends and configures, though you can choose a cheaper default instead if you prefer to start cheap and escalate.
The shape of the ladder is deliberate. Each tier is roughly a fraction of the cost of the one above it, so moving down a tier is a real cost saving and moving up is a real quality gain. Because even the top tier undercuts the Anthropic models so heavily, you can reasonably default to whichever tier matches your quality bar and still come out far ahead on cost.
Finding your own picks with the coding leaderboard
Models change constantly, and the three above will eventually be superseded. To choose current models, use OpenRouter’s coding leaderboard, which ranks models by real coding usage across all OpenRouter traffic:
https://openrouter.ai/rankings?benchmark=coding
That page shows which models developers are actually using for coding right now, which is a better signal than synthetic benchmarks alone because it reflects real-world preference. A sensible way to use it is to pick a strong, cheap model near the top of the list for your budget tier, a mid-priced strong performer for your middle tier, and a flagship for your top tier, then sort by price on each model’s page to confirm the cost order.
If you do choose your own models, you will replace three things wherever they appear in the commands below: the model slug (the provider-and-model identifier from the model’s OpenRouter page), the friendly tier name (a short lowercase label you invent, used to switch to that tier), and the price order (which determines which model is your budget, mid, and top tier). The only hard requirements are that each model supports chat completion and, if you want reasoning on your budget tier, that it supports a reasoning-effort setting. Everything else in this guide is model-agnostic: substitute the slugs and names and the rest works unchanged. If you are happy with the three picks above, you do not need to change anything; just follow the commands as written.
One detail worth knowing about reasoning models: a reasoning model generates hidden thinking tokens before its answer. That is usually desirable for quality, but it makes responses slower and consumes part of the output budget, which matters for whichever tier you make the default and for the request timeout. This guide handles it by putting maximum reasoning on the budget tier (the one you switch down to) rather than on the default, so keep that in mind if you rearrange the tiers.
Phase 1: Base system
Run these as root on the host to bring the system up to date and install the basic tools.
apt update && apt -y full-upgrade
apt -y install \
  ca-certificates curl wget gnupg git \
  build-essential ripgrep jq htop tmux \
  unattended-upgrades python3 python3-venv pipx
timedatectl set-timezone America/Los_Angeles
Change the timezone to your own. The build tools and utilities are not all strictly required, but they make the host pleasant to work on and cover what later phases assume.
Optional host hardening, recommended because this host runs an always-on agent reachable over your network:
apt -y install fail2ban nftables
fail2ban temporarily bans IP addresses after repeated failed SSH logins, which blunts brute-force attempts. nftables is the Linux firewall, which you can use to restrict inbound access to your network only. Skip these if your host is already firewalled upstream or you manage hardening your own way.
Phase 2: Create the service user
Everything after this phase runs as an unprivileged service user, not root. Create it now.
adduser --gecos "" [SERVICE_USER]
usermod -aG sudo [SERVICE_USER]
loginctl enable-linger [SERVICE_USER]
Set a password when prompted. The linger setting lets this user’s services run without an active login and start at boot, which is what eventually lets the router come back after a reboot on its own. Confirm both took effect:
groups [SERVICE_USER]
loginctl show-user [SERVICE_USER] | grep Linger
You want the groups line to include sudo and the Linger line to read yes.
A golden rule for the rest of the guide: after the user exists, always connect by SSH as that user, never by switching to it with su from a root shell. Per-user services and rootless containers need a real login session, which su does not provide. If a later phase reports that it cannot connect to a user bus or find a socket, the usual cause is that you are in an su shell instead of a real SSH login.
Phase 3: SSH key access
From your client PC, generate a key if you do not already have one, then copy its public half to the host so you can log in without a password.
On Windows PowerShell:
ssh-keygen -t ed25519 -f $env:USERPROFILE\.ssh\id_ed25519
type $env:USERPROFILE\.ssh\id_ed25519.pub | ssh [SERVICE_USER]@[HOST_IP] "mkdir -p ~/.ssh && chmod 700 ~/.ssh && cat >> ~/.ssh/authorized_keys && chmod 600 ~/.ssh/authorized_keys"
Enter the user’s password once when prompted. Then test that key login works:
ssh [SERVICE_USER]@[HOST_IP]
If it logs in without asking for a password, the key works. Leave password authentication enabled for now so you do not lock yourself out; lock it down later, only after confirming key login from every device you use.
All remaining host commands run as the service user over SSH.
Phase 4: Rootless Docker for the gateway
LiteLLM runs in a container, and running the container engine rootless keeps the whole stack inside the service user’s account with no system-level daemon. Install Docker Engine first, using sudo for the system steps.
sudo install -m 0755 -d /etc/apt/keyrings
sudo curl -fsSL https://download.docker.com/linux/debian/gpg -o /etc/apt/keyrings/docker.asc
sudo chmod a+r /etc/apt/keyrings/docker.asc
echo "deb [arch=$(dpkg --print-architecture) signed-by=/etc/apt/keyrings/docker.asc] https://download.docker.com/linux/debian $(. /etc/os-release && echo $VERSION_CODENAME) stable" | sudo tee /etc/apt/sources.list.d/docker.list > /dev/null
sudo apt update
sudo apt -y install docker-ce docker-ce-cli containerd.io docker-buildx-plugin docker-compose-plugin uidmap dbus-user-session slirp4netns fuse-overlayfs
sudo systemctl disable --now docker.service docker.socket
The last line disables the system-wide Docker because you will use the rootless per-user version instead. Note the use of tee for the repository line: a plain redirect into a system path would run as your shell before sudo takes effect and fail with a permission error.
Now enable rootless mode for the service user. This must run in a real SSH login.
dockerd-rootless-setuptool.sh install
systemctl --user enable --now docker
echo 'export PATH=/usr/bin:$PATH' >> ~/.bashrc
echo 'export DOCKER_HOST=unix:///run/user/$(id -u)/docker.sock' >> ~/.bashrc
source ~/.bashrc
The id form resolves your real user id automatically; do not hardcode a number there. Verify the engine is up and can run a container:
systemctl --user status docker
docker run --rm hello-world
You want the status to read active and running, and the hello-world container to print its greeting. If you see a message about failing to connect to a user bus or a missing socket, you are in an su shell; disconnect, SSH in as the service user, and re-run the rootless step.
Phase 5: Toolchain and Claude Code
Install a user-level version manager, then Node and Python through it, then Claude Code itself.
curl https://mise.run | sh
echo 'eval "$(~/.local/bin/mise activate bash)"' >> ~/.bashrc
source ~/.bashrc
mise use -g node@22 python@3.12
node --version && python --version
Then install Claude Code and confirm it runs:
curl -fsSL https://claude.ai/install.sh | bash
export PATH="$HOME/.local/bin:$PATH"
claude --version
claude doctor
Note the full path to the Node binary that the version manager installed. You will need the resolved, version-specific path later for the service unit, and using the resolved path rather than a major-version symlink matters because the symlink target can shift when the version manager updates. Find it with:
readlink -f "$(command -v node)"
Keep that path handy; it appears again in Phase 10.
Phase 6: Secrets file
Create a secrets file holding the three keys the stack needs: a master key you invent for the gateway, the same master key reused by the router, and your OpenRouter API key. Lock the file down so only your user can read it.
mkdir -p ~/.config
umask 077
cat > ~/.config/claude-secrets.env << 'EOF'
# Gateway master key (invent a strong random string)
LITELLM_MASTER_KEY=sk-local-CHANGE_ME

# Router key (invent another strong random string)
CCR_APIKEY=CHANGE_ME

# Your OpenRouter API key
OPENROUTER_API_KEY=PASTE_OPENROUTER_KEY
EOF
chmod 600 ~/.config/claude-secrets.env
Replace the two CHANGE_ME values with strong random strings and paste your real OpenRouter key. A quick way to generate the random keys is to run an openssl random-hex command and copy the output into the file. Once the file looks right, load it into your current shell so the values are available immediately:
set -a; source ~/.config/claude-secrets.env; set +a
echo "master key loaded: ${LITELLM_MASTER_KEY:0:8}..."
echo "router key loaded: ${CCR_APIKEY:0:8}..."
echo "openrouter key loaded: ${OPENROUTER_API_KEY:0:10}..."
You want all three to print non-empty prefixes. A recurring source of confusion later is a shell where these are empty, which produces a malformed-key error from the gateway; the fix in that case is always to source this file again. You do not need to auto-load these in every shell, because the launcher functions and the service both load the file themselves, but you may add an auto-load line to your shell profile if you prefer.
One naming caution: do not store an OpenRouter or any other key under the name ANTHROPIC_API_KEY in a file that gets auto-loaded into every shell. That particular variable name changes how Claude Code bills and routes, and having it set globally can silently bypass the gateway. The keys here use their own distinct names for that reason.
Phase 7: LiteLLM gateway config
This is the heart of the setup. The gateway config lists your three OpenRouter models, sets per-model handling, and defines the failover mesh. Create it now.
mkdir -p ~/litellm
cat > ~/litellm/config.yaml << 'EOF'
model_list:
  # ---- OpenRouter pay-per-use tiers (cheapest to most expensive) ----

  # Tier 1 (cheapest, switch-down tier): with reasoning enabled
  - model_name: deepseek-flash
    litellm_params:
      model: openai/deepseek/deepseek-v4-flash
      api_base: https://openrouter.ai/api/v1
      api_key: os.environ/OPENROUTER_API_KEY
      reasoning_effort: xhigh
      drop_params: true
      additional_drop_params: ["thinking", "enable_thinking"]

  # Tier 2 (mid)
  - model_name: mimo
    litellm_params:
      model: openai/xiaomi/mimo-v2.5-pro
      api_base: https://openrouter.ai/api/v1
      api_key: os.environ/OPENROUTER_API_KEY
      drop_params: true
      additional_drop_params: ["reasoning", "thinking", "enable_thinking"]

  # Tier 3 (top)
  - model_name: qwen-max
    litellm_params:
      model: openai/qwen/qwen3.7-max
      api_base: https://openrouter.ai/api/v1
      api_key: os.environ/OPENROUTER_API_KEY
      drop_params: true
      additional_drop_params: ["reasoning", "thinking", "enable_thinking"]

litellm_settings:
  drop_params: true
  modify_params: true
  num_retries: 2
  request_timeout: 300
  fallbacks: [{"deepseek-flash": ["mimo", "qwen-max"]}, {"mimo": ["deepseek-flash", "qwen-max"]}, {"qwen-max": ["mimo", "deepseek-flash"]}]
EOF
Several parts of this file carry hard-won detail, so here is what each piece is doing and why.
The model line uses a doubled prefix, an openai prefix followed by the real OpenRouter slug. The first part tells the gateway to use its OpenAI-compatible path, and the rest is the actual model identifier on OpenRouter. So a model whose OpenRouter slug is a vendor name plus a model name becomes, in this file, openai followed by a slash followed by that whole slug. This pattern repeats for all three models.
The api_base points at OpenRouter’s OpenAI-compatible endpoint, and the api_key reads your OpenRouter key from the environment by name rather than embedding it in the file. The key reaches the container in Phase 8.
The drop_params and additional_drop_params settings strip thinking-related fields that Claude Code attaches to requests. Some model endpoints reject unexpected fields, so dropping them avoids errors. There is a deliberate asymmetry here worth understanding. For the two non-reasoning tiers, the drop list includes a reasoning field, because you do not need those models to think and stripping the field is cleanest. For the budget tier, the drop list deliberately omits the reasoning field and instead sets a reasoning effort, because that tier is configured to think at maximum effort. If you do not want reasoning on your budget model, give it the same drop list as the others and remove the reasoning-effort line.
A subtle point about reasoning models and field names: the effort is set with a reasoning-effort field, and the value that the OpenRouter path accepts for maximum reasoning is a specific keyword. Sending the wrong keyword can cause the request to silently fall back to default effort rather than maximum. The value in this file is the one that lands correctly. After you bring the gateway up, the verification step confirms reasoning is actually flowing, because this is exactly the kind of thing that fails quietly.
The global settings block sets a couple of general behaviors and, importantly, raises the request timeout well above the default. Reasoning models on demanding tasks can take a while, and a short timeout would cut them off and force unnecessary failovers. A generous timeout gives a hard request room to finish. The retry count means a transient hiccup is retried on the same model before any failover kicks in, so momentary blips do not bounce you to a different model unnecessarily.
The failover mesh is the resilience layer. Each model is given an ordered list of backups. Every model fails over to the others, generally trying a cheaper one first, so that an outage on any single model cascades to another rather than surfacing as an error. The retries happen first on the original model, and only a real failure moves the request down its fallback list. This is what lets the setup run unattended: a provider problem on one model routes around itself.
Substitute every bracketed placeholder with your real names and slugs before saving. Then validate that the file is well-formed YAML:
python3 -c "import yaml; yaml.safe_load(open('/home/[SERVICE_USER]/litellm/config.yaml')); print('YAML OK')"
Phase 8: Run the gateway
Start the gateway container, passing in the two keys it needs through the environment. The config file is mounted from your home directory so you can edit it later without rebuilding anything.
set -a; source ~/.config/claude-secrets.env; set +a

docker run -d --name litellm --restart unless-stopped \
  -p 127.0.0.1:4000:4000 \
  -v ~/litellm/config.yaml:/app/config.yaml \
  -e LITELLM_MASTER_KEY="$LITELLM_MASTER_KEY" \
  -e OPENROUTER_API_KEY="$OPENROUTER_API_KEY" \
  docker.litellm.ai/berriai/litellm:main-stable \
  --config /app/config.yaml --port 4000
The port binding deliberately listens only on the loopback address, so the gateway is reachable from the host itself but not exposed to your network. The restart policy brings the container back on its own after a reboot. The stable image tag avoids a period when some published packages had a security advisory.
One thing to internalize about how the keys reach the container: they are baked in at the moment you run this command, read from your shell environment. If you ever change a key, you cannot simply restart the container to pick up the new value; you must remove the container and run this command again with the new value loaded in your shell. A plain restart reuses the original environment. This catches people out, because editing the config file is enough for model changes but is not enough for key changes.
Confirm the container is up and the config loaded without error:
docker ps
docker logs --tail 20 litellm
You want the container listed as up and the log free of parse errors or tracebacks, ending with the gateway reporting that it has set its models, including your three names.
Phase 9: Verify the models and reasoning
Before wiring up the router, confirm each model actually responds through the gateway, and confirm the reasoning model is genuinely reasoning. Use a realistic token budget for these tests; a tiny budget starves a reasoning model so that it spends everything thinking and returns empty content, which looks like a failure but is only a too-small budget.
First, list the registered models:
set -a; source ~/.config/claude-secrets.env; set +a
curl -s http://127.0.0.1:4000/v1/models -H "Authorization: Bearer $LITELLM_MASTER_KEY" \
  | python3 -c "import sys,json;[print(' -',m['id']) for m in json.load(sys.stdin)['data']]"
You want exactly your three names listed. Then call each one and confirm a real reply, with a generous budget:
for M in deepseek-flash mimo qwen-max; do
  R=$(curl -s http://127.0.0.1:4000/v1/chat/completions \
    -H "Authorization: Bearer $LITELLM_MASTER_KEY" -H "Content-Type: application/json" \
    -d "{\"model\":\"$M\",\"messages\":[{\"role\":\"user\",\"content\":\"reply with one word: ok\"}],\"max_tokens\":2000}")
  echo "  $M -> $(echo "$R" | python3 -c "import sys,json;d=json.load(sys.stdin);print(d['choices'][0]['message'].get('content') if 'choices' in d else 'ERROR: '+str(d)[:120])" 2>/dev/null)"
done
All three should print a short reply. If one prints nothing with a small budget but works with the larger budget shown here, that was the starvation effect, not a real fault.
Now confirm the budget model is actually reasoning at high effort, and time a demanding request so you know it fits comfortably under the timeout:
time curl -s http://127.0.0.1:4000/v1/chat/completions \
  -H "Authorization: Bearer $LITELLM_MASTER_KEY" -H "Content-Type: application/json" \
  -d '{"model":"deepseek-flash","messages":[{"role":"user","content":"Write a complete Python implementation of a thread-safe LRU cache with TTL expiration, including docstrings, type hints, and a usage example. Then explain the design tradeoffs."}],"max_tokens":4000}' \
  | python3 -c "
import sys,json
d=json.load(sys.stdin)
if 'choices' in d:
    m=d['choices'][0]['message']
    print('  content length:', len(m.get('content') or ''), 'chars')
    print('  reasoning present:', bool(m.get('reasoning_content')))
    print('  finish_reason:', d['choices'][0].get('finish_reason'))
else:
    print('  ERROR:', str(d)[:150])
"
A healthy result is a substantial answer that finishes naturally, with reasoning present, completing well under the timeout. The time it takes tells you your headroom; a demanding request finishing in well under a minute means even much larger requests will fit inside the timeout, and the setup is safe to run unattended. If the reasoning indicator is absent, the reasoning field was stripped before reaching the model, and you would revisit the budget model’s drop list and reasoning-effort setting.
Phase 10: Install and configure the router
CCR is a Node application. Install it for the service user.
npm install -g @musistudio/claude-code-router
ccr version
Note the absolute path to the installed router and its underlying script, which a later step needs:
readlink -f "$(command -v ccr)"
That prints the real JavaScript entry point, typically ending in a cli file. Keep it together with the resolved Node path from Phase 5.
Now write the router config. Because the router does no classification in this design, the config is short: one provider pointing at the gateway, listing your three models, with all routes pointing at your chosen default tier. Use absolute paths throughout this file; environment-style placeholders are not expanded inside it.
mkdir -p ~/.claude-code-router
cat > ~/.claude-code-router/config.json << 'EOF'
{
  "LOG": true,
  "HOST": "127.0.0.1",
  "PORT": 3456,
  "APIKEY": "$CCR_APIKEY",
  "Providers": [
    {
      "name": "cloud",
      "api_base_url": "http://127.0.0.1:4000/v1/chat/completions",
      "api_key": "$LITELLM_MASTER_KEY",
      "models": ["deepseek-flash", "mimo", "qwen-max"]
    }
  ],
  "Router": {
    "default": "cloud,qwen-max",
    "background": "cloud,qwen-max",
    "think": "cloud,qwen-max",
    "longContext": "cloud,qwen-max",
    "longContextThreshold": 200000,
    "fallback": "cloud,qwen-max"
  }
}
EOF

python3 -c "import json; json.load(open('/home/[SERVICE_USER]/.claude-code-router/config.json')); print('JSON OK')"
The config above sets qwen-max as the default, which is what this guide recommends: everyday sessions get the best quality automatically, and you drop to a cheaper tier only when you deliberately want to economize. Even the top OpenRouter tier is far cheaper than Anthropic’s models, so defaulting to it still saves the large majority of the cost. If you would rather start cheap and escalate by hand, change every cloud,qwen-max in the Router block to cloud,deepseek-flash (or your own budget tier name). The choice only affects which tier a fresh session starts on; you can always switch mid-session either way.
A few notes on this file. The single provider, named cloud, points at the gateway on loopback, which is what lets the router reuse all the gateway’s model handling and failover. There is intentionally no reasoning transformer block here. An earlier iteration of this project included one to suppress thinking fields for a strict cloud backend, but with that backend gone and a reasoning model now in play, such a block would fight against the reasoning you want, so it is omitted. The long-context threshold is set high enough that it never diverts requests, since all routes point at one model anyway; the big context windows of these models mean you are unlikely to approach any limit.
Phase 11: Run the router as a service
Running the router by hand means it does not survive a reboot and its output goes nowhere useful. A user-level service fixes both and needs no elevated privileges while you are logged in.
Capture the two absolute paths the service needs, since a service has no shell path and must call binaries by their full location:
NODE_BIN="$(readlink -f "$(command -v node)")"
CCR_CLI="$(readlink -f "$(command -v ccr)")"
echo "node: $NODE_BIN"
echo "ccr cli: $CCR_CLI"
Write the service unit, substituting those two paths and your service user:
mkdir -p ~/.config/systemd/user
cat > ~/.config/systemd/user/ccr.service << EOF
[Unit]
Description=Claude Code Router
After=network-online.target
Wants=network-online.target

[Service]
Type=simple
EnvironmentFile=/home/[SERVICE_USER]/.config/claude-secrets.env
Environment=PATH=$(dirname "$NODE_BIN"):/usr/local/bin:/usr/bin:/bin
Environment=HOME=/home/[SERVICE_USER]
ExecStartPre=/bin/rm -f /home/[SERVICE_USER]/.claude-code-router/.claude-code-router.pid
ExecStart=$NODE_BIN $CCR_CLI start
Restart=on-failure
RestartSec=5
StandardOutput=append:/home/[SERVICE_USER]/.claude-code-router/ccr-service.log
StandardError=append:/home/[SERVICE_USER]/.claude-code-router/ccr-service.log

[Install]
WantedBy=default.target
EOF
Two choices in this unit are the difference between it working and failing, so they are worth understanding.
The line that removes a pidfile before each start is essential, not optional. The router’s start command checks for a pidfile, and if one exists it assumes the server is already running, prints a message to that effect, and exits successfully without starting anything. The router does not always remove that pidfile when its process ends, so after a crash, a kill, or a reboot, a stale pidfile is left pointing at a process that no longer exists. The next start finds that orphan file, concludes the server is already up, and exits with a success code. The service then shows as dead immediately after starting, with a successful exit status, which is confusing precisely because nothing looks like it failed. Removing the pidfile before each start guarantees the start actually launches the server.
The service calls the Node binary directly with the router script as an argument, rather than invoking the router’s wrapper command, because a service has no shell path and the wrapper would fail to resolve with a command-not-found error. Pinning the fully resolved Node path, rather than a major-version symlink, matters because the symlink target can change when the version manager updates, which would silently break the service later.
Stop any hand-started router so the service owns the single instance, then enable and start it:
ccr stop 2>/dev/null
pkill -f 'claude-code-router' 2>/dev/null
sleep 2
systemctl --user daemon-reload
systemctl --user enable --now ccr.service
sleep 3
systemctl --user status ccr.service --no-pager
curl -s http://127.0.0.1:3456/ -H "Authorization: Bearer $CCR_APIKEY" -o /dev/null -w "%{http_code}\n"
You want the service to report active and running, holding the same process id across a few seconds rather than restarting in a loop, and the request to return a 200. If the service instead shows as dead with a success status right after starting, that is the stale-pidfile symptom; confirm the pidfile-removal line is present and that its path matches your service user’s home. Confirm stability after ten seconds:
sleep 10
systemctl --user status ccr.service --no-pager | grep -E "Active|Main PID"
The same process id after ten seconds, with no churn, means it is solid.
To make the service start at boot before any login, lingering must be enabled for the service user, which you did in Phase 2. If you skipped it or it did not take, an administrator runs the enable-linger command once for the user. Until that is set, the service starts on login rather than at cold boot.
Phase 12: Launchers
Add two launcher functions to your shell profile. The first runs Claude Code through the router normally, with permission prompts. The second adds a flag that skips those prompts for unattended or high-trust use.
cat >> ~/.bashrc << 'EOF'

claude-ccr() {
  set -a; source ~/.config/claude-secrets.env; set +a
  CLAUDE_CONFIG_DIR=~/.claude-ccr \
  ANTHROPIC_BASE_URL=http://127.0.0.1:3456 \
  ANTHROPIC_AUTH_TOKEN="$CCR_APIKEY" \
  CLAUDE_CODE_DISABLE_EXPERIMENTAL_BETAS=1 \
  claude "$@"
}

claude-ccr-yolo() {
  set -a; source ~/.config/claude-secrets.env; set +a
  CLAUDE_CONFIG_DIR=~/.claude-ccr \
  ANTHROPIC_BASE_URL=http://127.0.0.1:3456 \
  ANTHROPIC_AUTH_TOKEN="$CCR_APIKEY" \
  CLAUDE_CODE_DISABLE_EXPERIMENTAL_BETAS=1 \
  claude --dangerously-skip-permissions "$@"
}
EOF
source ~/.bashrc
Define these as functions, not aliases; a function loads the secrets itself each time it runs, which is what keeps the keys fresh. The base URL points Claude Code at the router. The auth token is the router key. The beta-disabling flag stops a header the gateway cannot forward, which otherwise produces a misleading error about a model not existing or not being accessible.
A point that trips people up: defining a function in your shell profile only affects new shells or shells where you have re-sourced the profile. If you add the function and then immediately try to run it in the same old shell without sourcing, it will not be found. The source line above loads it into the current shell; new terminals get it automatically.
Create the router profile directory and a minimal settings file. Keep this file minimal, because a stray model or environment block in it can silently override the launcher.
mkdir -p ~/.claude-ccr
echo '{"theme":"dark"}' > ~/.claude-ccr/settings.json
If you want the permission-skipping launcher to run without even a one-time warning prompt, add a setting that suppresses that warning:
python3 - << 'PYEOF'
import json, os
p = os.path.expanduser("~/.claude-ccr/settings.json")
d = json.load(open(p)) if os.path.exists(p) else {}
d["skipDangerousModePermissionPrompt"] = True
json.dump(d, open(p, "w"), indent=2)
print("done")
PYEOF
Use the permission-skipping launcher with care. It runs tool calls, including file edits and shell commands, without asking. The strongest safety circuit-breakers still apply, but routine destructive actions will not prompt. For everyday work, prefer the launcher with prompts, and reserve the skipping one for well-scoped tasks you are watching, especially since every request now costs money and an unattended loop can run up usage.
Phase 13: Use it and switch tiers
Open a fresh terminal so the launcher functions are loaded, then start a session:
claude-ccr
Or, for a session that does not prompt for each action:
claude-ccr-yolo
Your default tier serves the session. To switch tiers mid-session, use the model command with the provider and model name as an argument. This is the important detail: the bare model command opens Claude Code’s built-in picker, which only knows Anthropic’s own models and cannot show yours, because Claude Code does not know it is talking to a router. The picker is therefore the wrong tool here. The argument form is what actually switches you:
/model cloud,deepseek-flash
/model cloud,mimo
/model cloud,qwen-max
Each command points the session at that tier. The switch lasts for the session; a new session reverts to the default in your router config. So you might default to one tier and drop to a cheaper one for a stretch of routine work, then let the next session return to the default on its own.
To confirm a switch landed on the model you expect, watch the gateway log while you send a message after switching:
docker logs --tail 5 litellm 2>&1 | grep -i 'model'
The model the gateway received should match the tier you switched to.
Operating it day to day
Restarting after a config change depends on what changed. If you edited the gateway config to change model settings or the failover mesh, a restart of the gateway container is enough. If you changed a key, you must remove and recreate the container so it picks up the new environment, because a restart reuses the old environment. If you changed the router config, restart the router service.
# Gateway: model or failover config changed
docker restart litellm

# Gateway: a key changed (must recreate, not restart)
# stop and remove, then re-run the Phase 8 docker run command with keys loaded

# Router: config changed
systemctl --user restart ccr.service
Health checks for the two services:
# Router answers on its port
curl -s http://127.0.0.1:3456/ -H "Authorization: Bearer $CCR_APIKEY" -o /dev/null -w "ccr: %{http_code}\n"

# Gateway lists its models
curl -s http://127.0.0.1:4000/v1/models -H "Authorization: Bearer $LITELLM_MASTER_KEY" -o /dev/null -w "litellm: %{http_code}\n"
After a reboot, two independent pieces must be up: the gateway container and the router service. The gateway returns on its own through its restart policy. The router returns through its service, on login, or at boot if lingering is enabled for the user. Neither depends on the other to start, but both must be running for a session to work. Confirm the gateway’s restart policy with an inspect command if you are unsure it will come back by itself.
If the router is ever not running and you need to bring it back by hand, clear any stale pidfile first, for the same reason the service does, then restart it:
set -a; source ~/.config/claude-secrets.env; set +a
rm -f ~/.claude-code-router/.claude-code-router.pid
ccr restart
sleep 2
curl -s http://127.0.0.1:3456/ -H "Authorization: Bearer $CCR_APIKEY" -o /dev/null -w "%{http_code}\n"
A 200 means you can launch a session again.
Tuning for cost and speed
You have a few levers once the setup runs. The default tier sets your baseline cost and speed; this guide defaults to the top tier for quality, which costs more per request than the cheaper tiers but is still far below Anthropic’s pricing, and you can choose a cheaper default if you would rather trade some quality for lower baseline cost. The reasoning effort on the budget tier trades depth for speed; maximum effort gives that tier the best answers but the slowest responses, and lowering it speeds the budget tier up if you find it sluggish when you switch down to it. The timeout protects any slow request, on any tier, from being cut off; the generous value in this guide gives a demanding request room to finish, and you can raise it further if you routinely work on very large tasks.
A note on where reasoning sits in this arrangement. With the top tier as the default, the model that serves most of your requests is the flagship, not the maximum-reasoning budget model, so your everyday path is tuned for quality rather than burdened by heavy reasoning overhead. The budget tier carries the maximum reasoning instead, which is sensible because that tier is the one you switch down to deliberately, and the extra reasoning helps the cheaper model punch above its price when you do. If you ever flip the default to the budget tier to economize, be aware that maximum reasoning makes it the slowest of the three on demanding work; in practice these models scale their thinking to the task and do not always burn the full budget, but if you want a cheap default to feel fast, lower its reasoning effort. There is no single right answer; it depends on whether you value depth, speed, or cost on the everyday path.
Troubleshooting
A malformed-key or missing-Bearer error from the gateway almost always means the relevant key was empty in the shell that made the request. Source the secrets file and retry. This is the single most common stumble, and it is harmless once you recognize it.
An authentication error mentioning the upstream provider, rather than the gateway, means your OpenRouter key is wrong or did not reach the container. Confirm the key is present inside the running container’s environment; if it is absent, recall that a key change requires recreating the container, not merely restarting it.
Empty content from a reasoning model on a tiny token budget is starvation, not failure. The model spent its small budget thinking and never reached an answer. Test with a realistic budget; real Claude Code requests use large budgets and do not hit this.
A model-not-found or no-access error inside Claude Code, when the gateway clearly has the model, usually means a name mismatch between the router’s model list and the gateway, or that the beta-disabling flag is not set in the launcher. Confirm the three names match exactly in both the gateway config and the router config, and that the launcher sets the beta-disabling flag.
The model picker not showing your models is expected and not a fault. That picker is hardcoded to Anthropic’s own models and has no knowledge of your router. Switch with the argument form of the model command instead.
The permission-skipping launcher reporting itself as not found is the shell-sourcing issue: the function exists in your profile but the current shell has not loaded it. Open a new terminal or source your profile, and it appears.
The service starting and then immediately showing as dead with a success status is the stale-pidfile problem described in Phase 11. The fix is the pidfile-removal line in the service unit. If the service instead reports a command-not-found failure, it is calling a wrapper that needs a shell path; call the Node binary and the router script by absolute path instead, and pin the resolved Node path rather than a version symlink.
The status banner reporting the service as not running while the port clearly answers is a known cosmetic quirk. Trust the port: a request to the router’s address returning a 200, with a listener on the port, means it is up.
A note on what this costs and saves
The whole point of this build is to run a capable coding agent for a small fraction of what the equivalent Anthropic models cost. Even defaulting to the most expensive of your three OpenRouter tiers tends to land far below Sonnet or Opus pricing, so the savings are large before you do anything clever. Dropping to the cheaper tiers for routine work stacks further savings on top, and the manual switch makes that a deliberate, visible choice rather than a hidden one. There is no free tier here, every request is paid, but the per-request cost is low enough that the trade is heavily in your favor compared with running on Anthropic’s own models, provided the OpenRouter models you choose are strong enough at your kind of work. That last condition is the one to verify for yourself with a few real sessions, since model quality on your specific tasks is the thing no guide can confirm for you.