(Part 2) How to Setup Authentication (Easy Auth) with a Custom Domain ONLY on the Front End (Application Gateway).

This guide is meant to build off my previous Authentication guide. To complete this, you need to make sure that you’ve finished setting up the other guide. Linked here.
I am creating this guide based on this documentation in the Microsoft Github.
The Request Workflow
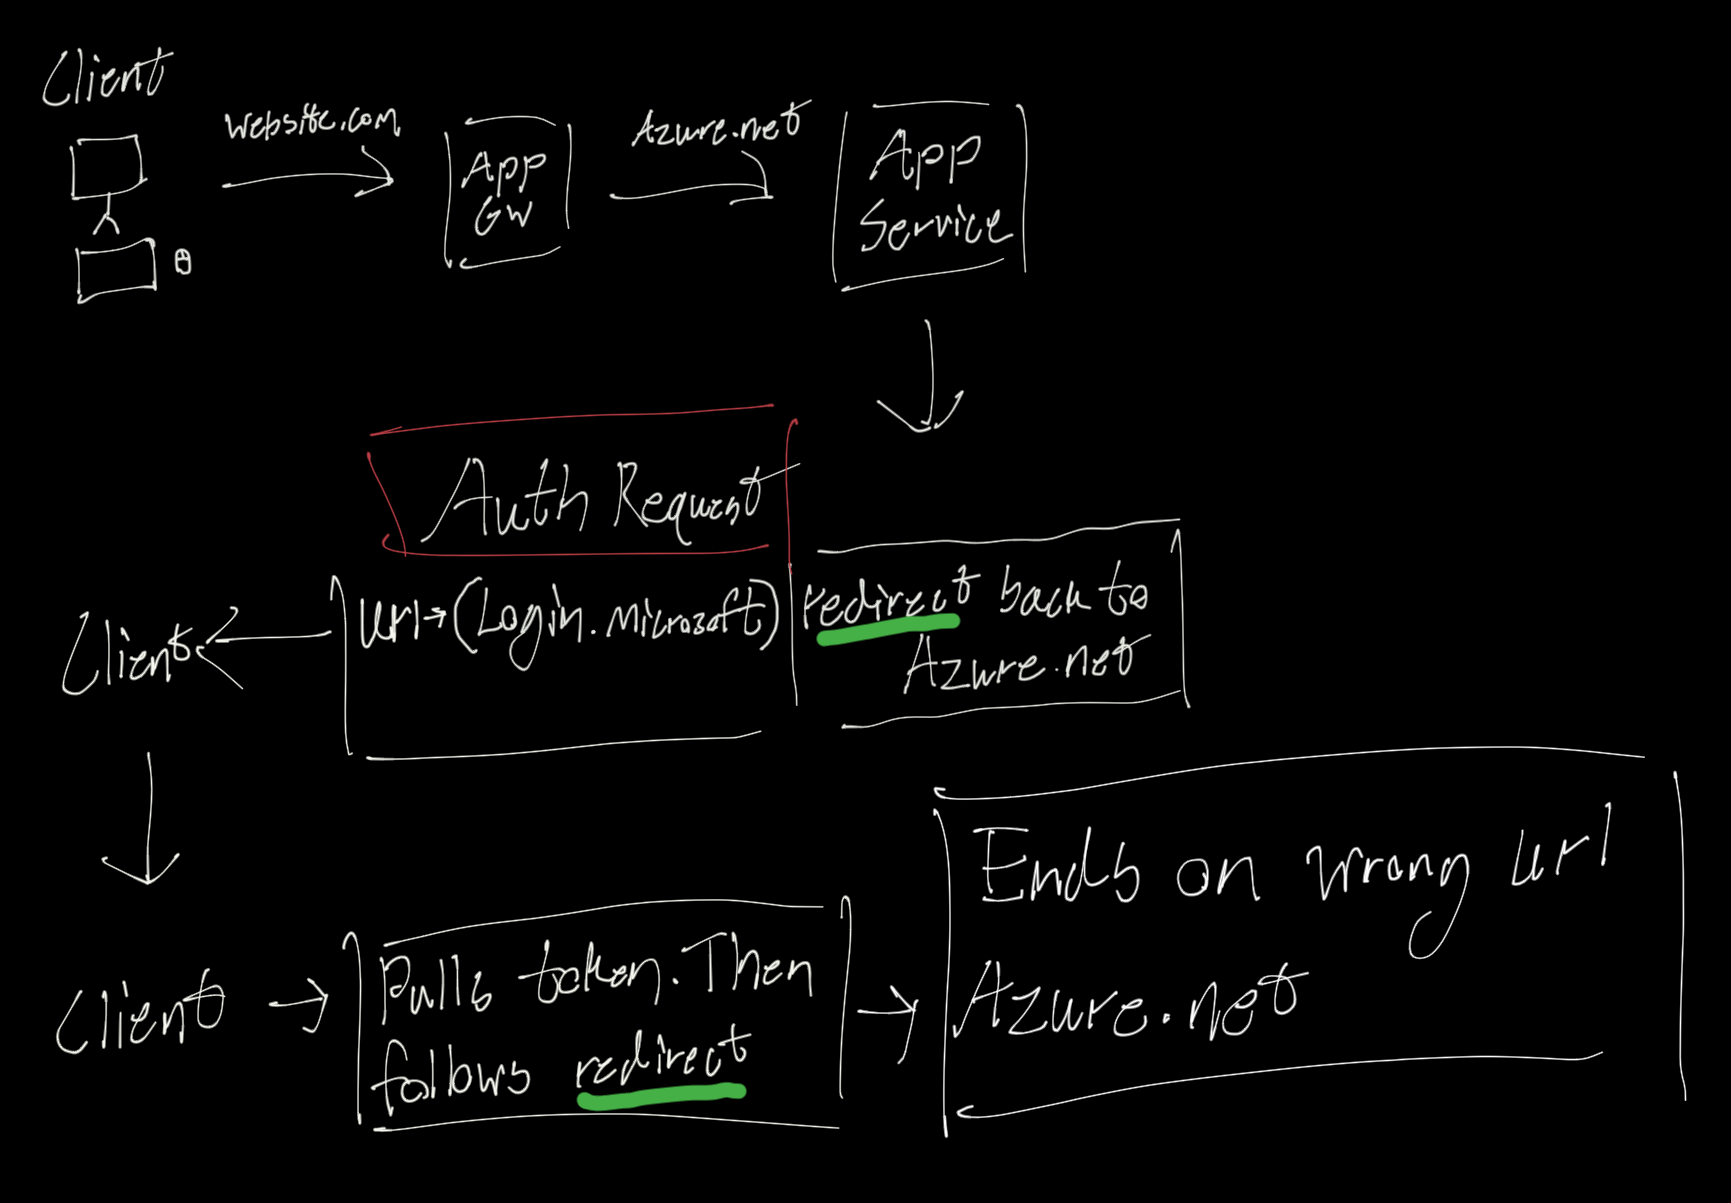
Prerequisites
For this guide we need a few things to get started.
- We need a working Easy Auth setup as I’ve shared a guide on earlier.
- We need an Application Gateway setup with a custom domain on the Front End.
- I’ll may make a separate guide on this because it has a couple steps before it’s working.
- This is the official documentation on this process.
1. Validating the prerequisites are working
First we will validate Easy Auth is working on the App Service
To do this, open your browser in an incognito window, Open the Dev Tools, switch to the Network tab, ensure ‘Preserve Log’ is checked. And reload your default App Service domain.
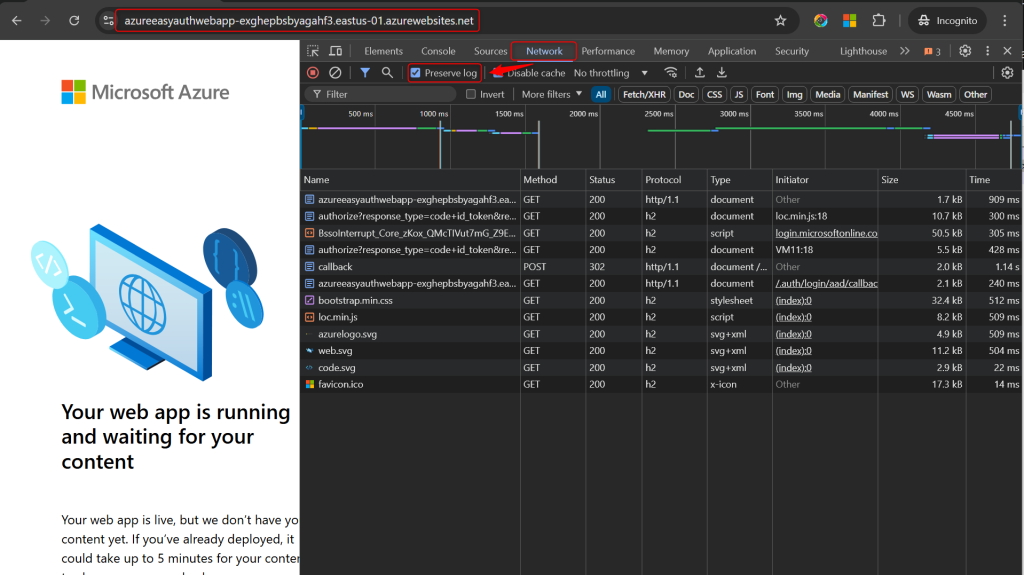
If Easy Auth is working you will see the original request, then an authorize request to get an Easy Auth Token. And if it all worked you will be quickly redirected back to your app service once it’s all done.
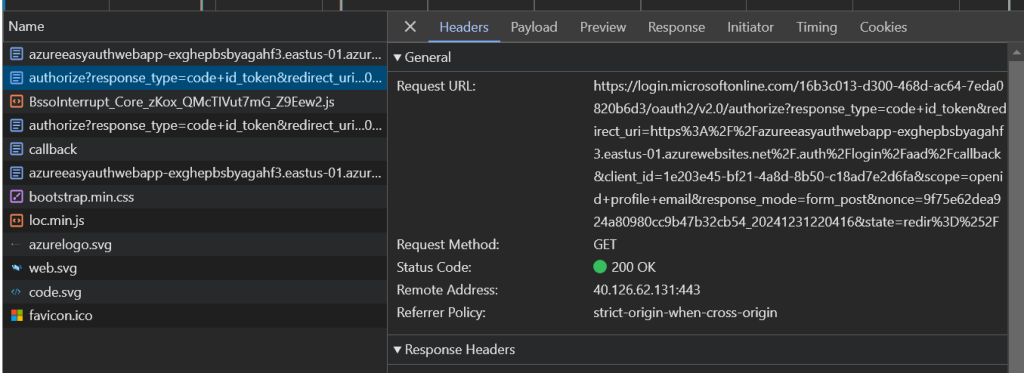
If this didn’t work. (I.e. you don’t see the redirect or you get an error loading your site) Check over the authentication setup for your App service, as a detail may have been missed.
Next we will validate the Application Gateway is working
If everything is setup correctly you should be able to request the custom domain, and after authentication it will direct you back to the default domain. THIS IS EXPECTED!
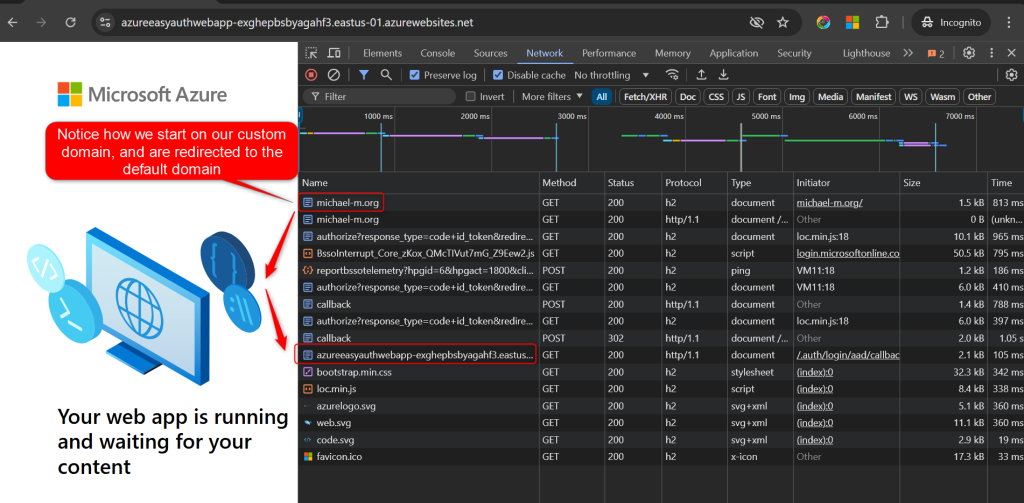
If your App Gw Test looks like this then we only need to set setting to get this working.
2. Setting up Authentication to Work
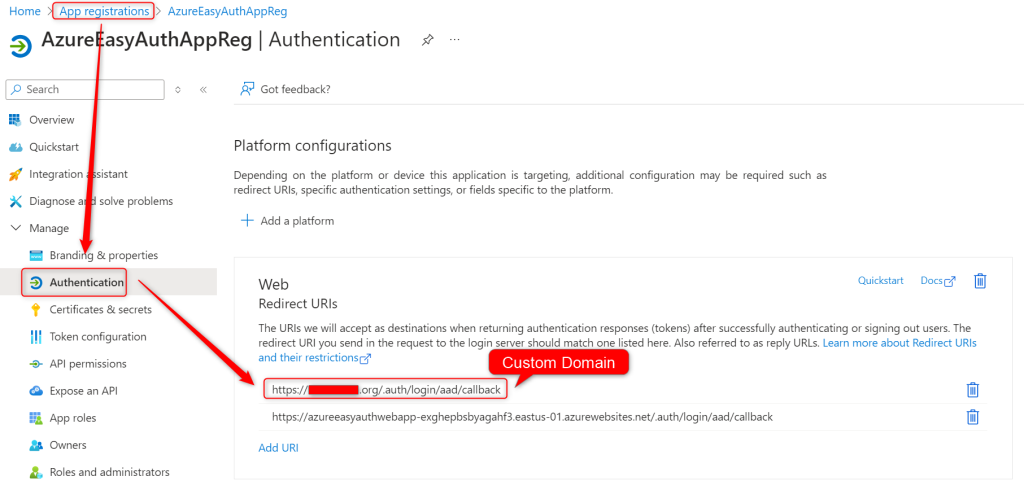
- First we need to allow your custom domain as a redirect URI in your App Registration. Enter in your callback URI and click save. I used https://customdomain.com/.auth/login/aad/callback
- We need to create a configuration file auth.json on our computer, to set a custom setting in the Applications Authentication Settings later.
- I’ve highlighted the important sections in blue below.
However there is more documentation on your configuration options located here.
{
    "properties": {
        "platform": {
            "enabled": true
        },
        "globalValidation": {
            "unauthenticatedClientAction": "RedirectToLoginPage",
            "redirectToProvider": "azureActiveDirectory"
        },
        "httpSettings": {
            "requireHttps": true,
            "forwardProxy": {
                "convention": "Custom",
				"customHostHeaderName": "X-Original-Host"
            }
        },
        "login": {
            "preserveUrlFragmentsForLogins": true,
            "allowedExternalRedirectUrls": [
                "https://azureeasyauthwebapp-exghepbsbyagahf3.eastus-01.azurewebsites.net/",
                "https://<CustomDomain>/"
            ]
        },
        "identityProviders": {
            "azureActiveDirectory": {
                "enabled": true,
                "registration": {
                    "openIdIssuer": "https://login.microsoftonline.com/<TenantID>/v2.0",
                    "clientId": "<AppReg Client ID>",
                    "clientSecretSettingName": "MICROSOFT_PROVIDER_AUTHENTICATION_SECRET"
                },
                "validation": {
                    "allowedAudiences": [
						"api://<ClientId>",
                        "https://<DefaultDomain>.azurewebsites.net/",
                        "https://<CustomDomain>/"
                    ]
                }
            }
        }
    }
}
This setting tells the app to look at the X-Original-Host header which the Application Gateway will pass, to use as a redirect URI for authentication.
From here we need to upload this custom config to our app service. There are multiple ways you could do this, but for accessibility I’ll upload it Via the portal.
- First Open up the cloud shell in the Azure portal
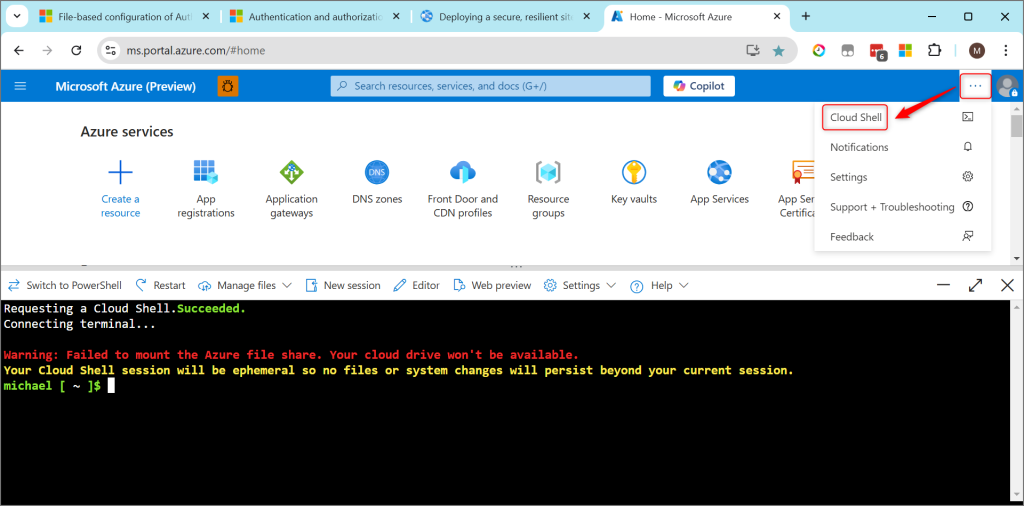
- Then Click Manage Files > Upload > And select your auth.json file.

- Once this is done we need to run a command and pass that file as our parameters.
az rest --uri /subscriptions/<SubId>/resourceGroups/<ResourceGroup>/providers/Microsoft.Web/sites/<AppName>/config/authsettingsV2?api-version=2020-09-01 --method put --body @auth.jsonAt this point our problem should be fixed!
3. Validate It’s working
From here we just need to collect another browser trace in an incognito session. We should now see the behavior we are looking for.
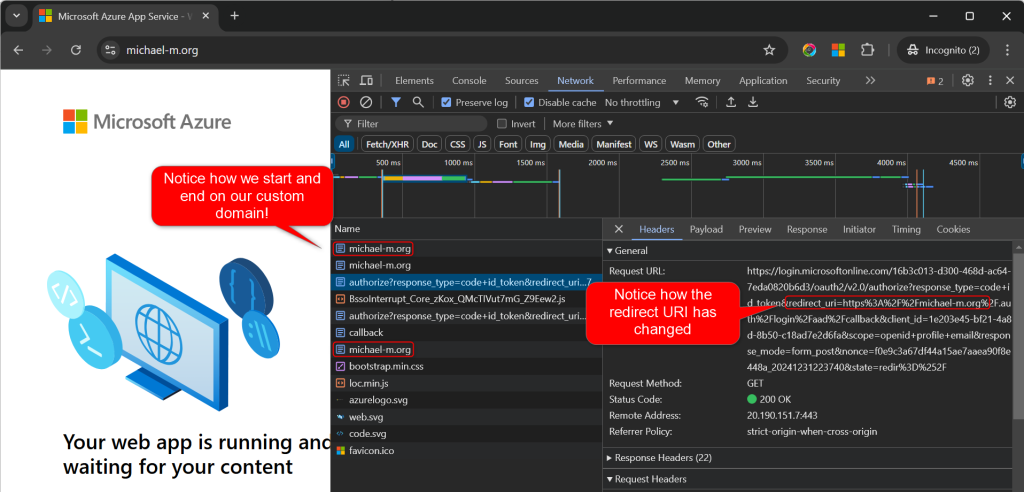
Notice how when we run through authentication we are routed back to our custom domain. This custom domain is not bound to the app service. So the app is using the header we send to tell where to set a redirect URI back to. We can also that in our first redirect.
And here is some extra documentation on this subject.
Considerations when using Azure Front Door

