Can you make a 2d “voxel” world in UE5?
The goal is simple, can I make a 2d voxel world in UE5? (5.1 to be specific)
The answer is yes, but I want to use the tools provided by the engine to create this, and ideally have it run as smoothly as possible to prevent hitches in framerate that make games unpleasant to play.
Possible Options
- HISM – Hierarchical Instanced Static Mesh
- ISM – Instanced Static Mesh
- Niagara
- Procedural mesh component
- Tile Map
HISM vs ISM
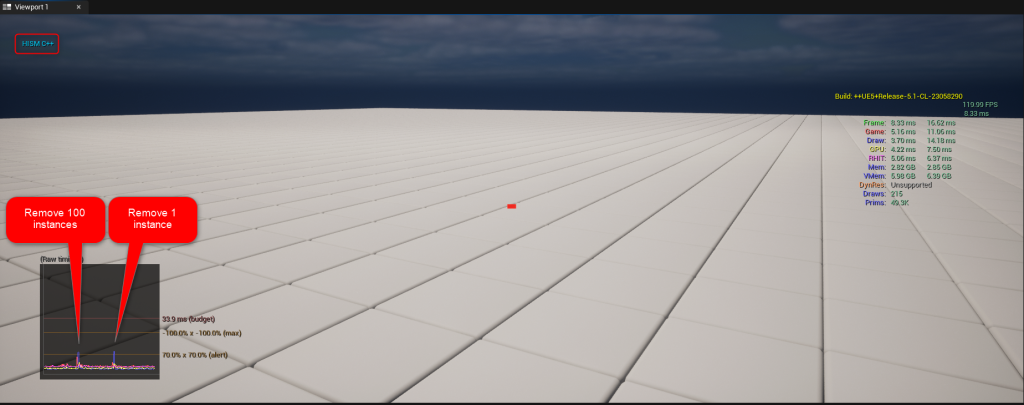
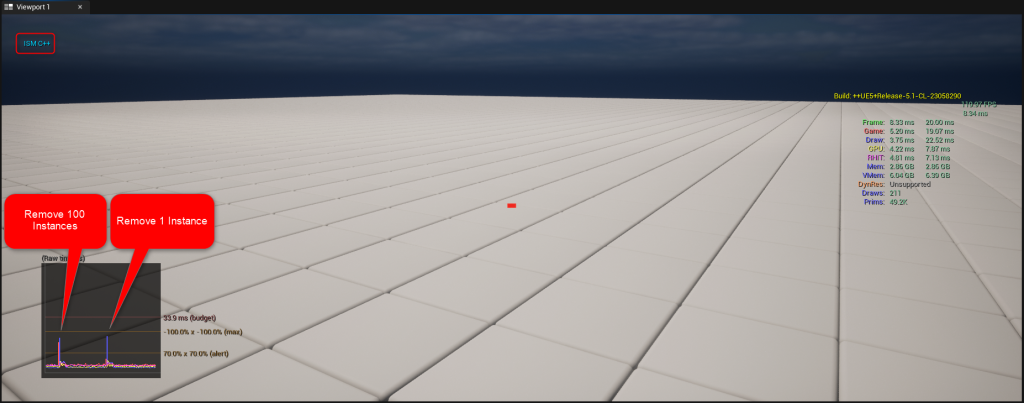
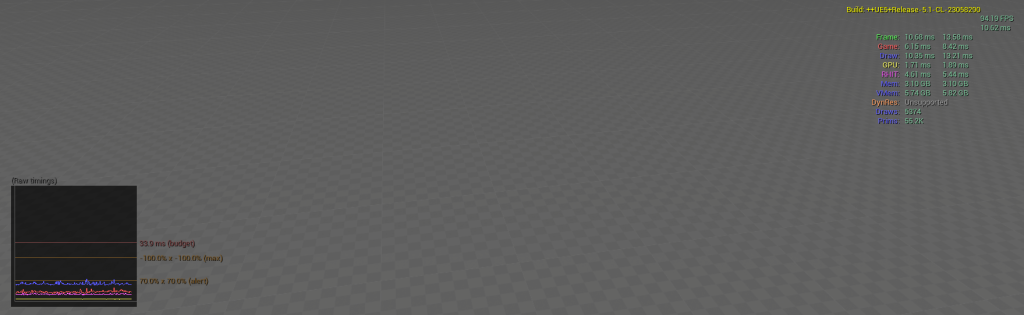
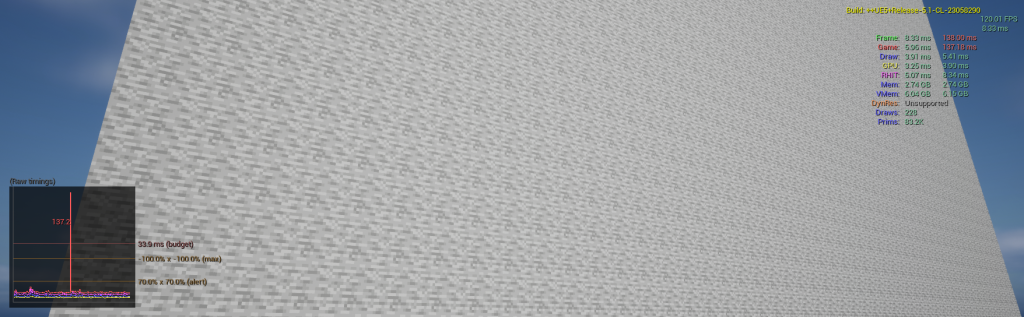
Spawning a 50×50 grid (2,500 total) took each Instance mesh component about the same amount of time. (132-137ms)
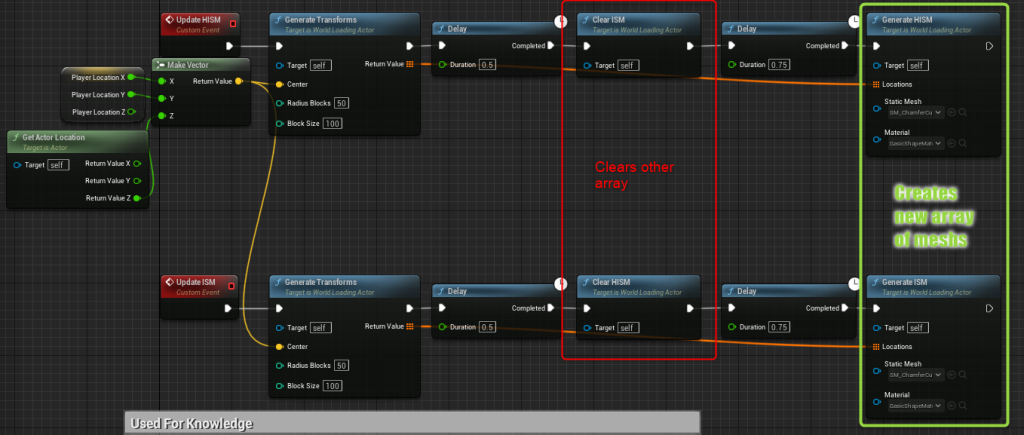
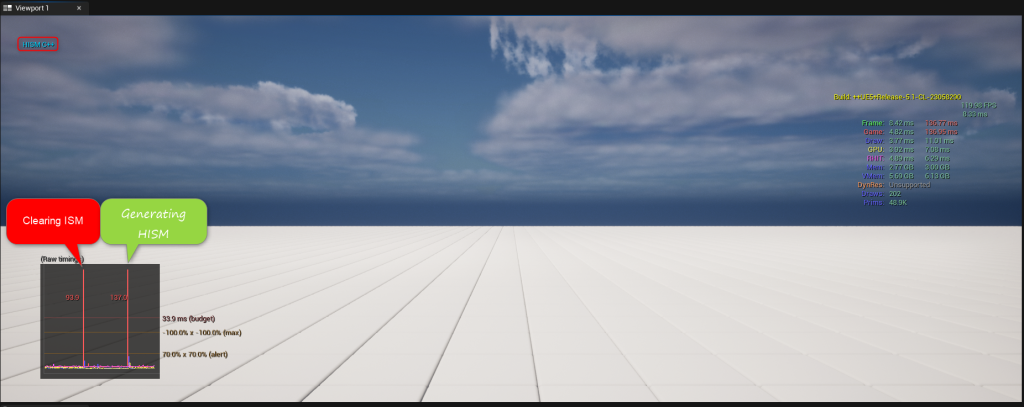
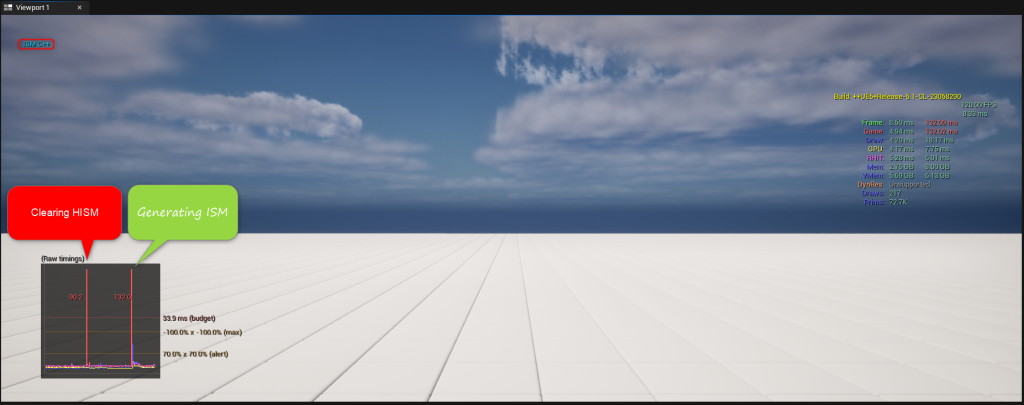
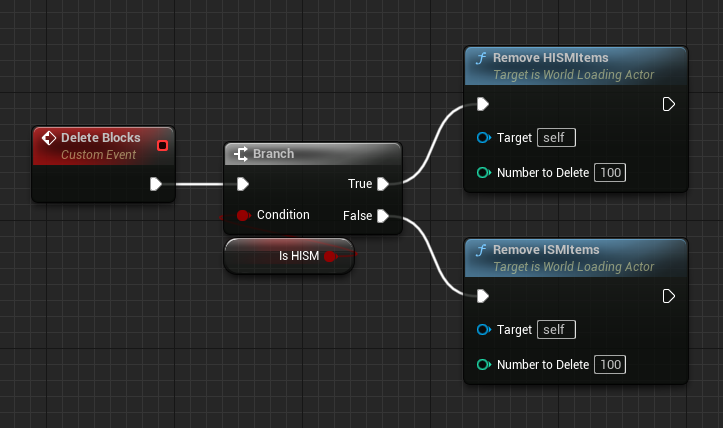
However the HISM really shined when removing blocks. When removing blocks, the HISM performed almost twice as fast as the ISM. Quickly putting the ISM out of the running.
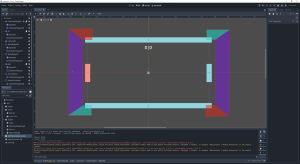
In this test, I setup the players left and right clicks to send a line trace, and if it hit the HISM/ISM actor it would delete 100 or 1 instance (Based on the click). This uses the C++ function “RemoveInstances”.
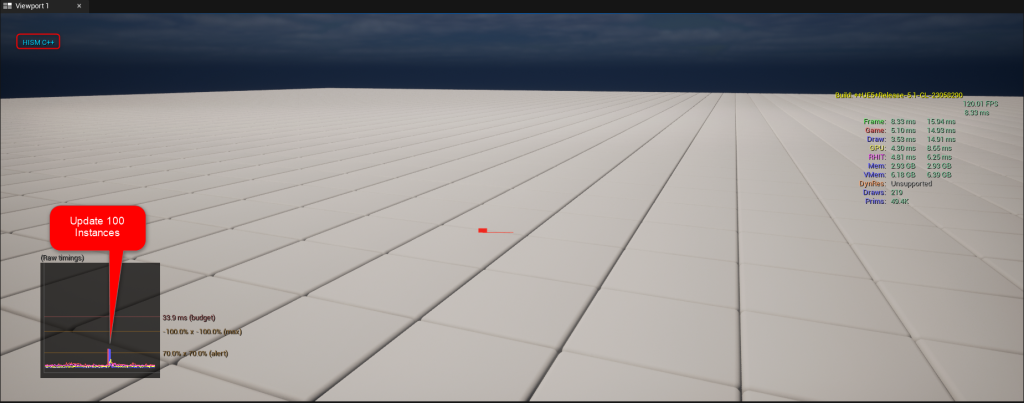
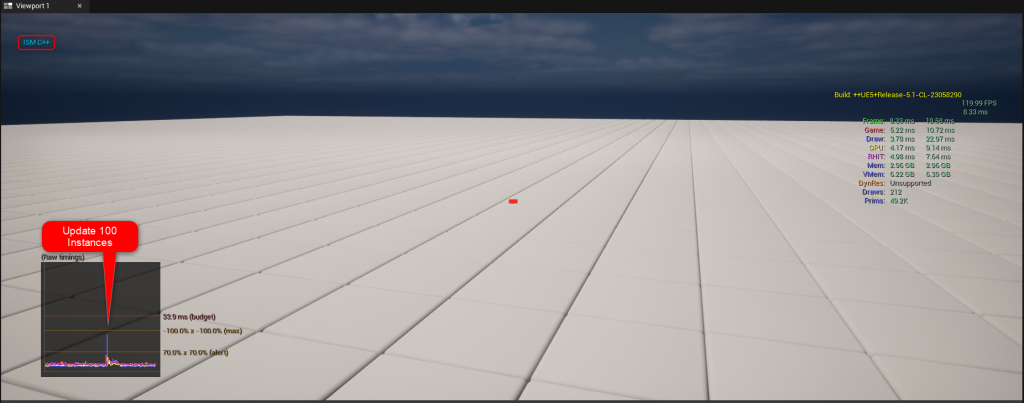
The last thing to look into is using the UpdateInstanceTransform function in C++. Instead of removing the instances completely, we would move instances to a new location. Hopefully reducing overhead on the game.
to test this I ran a similar test to the last, but this time we moved the first 100 instances.
This hopefully will conclude my HISM and ISM testing for today. Clearly showing a winner that HISMs seem to be more performant. Please keep in mind these are default settings and doing things like disabling collision can greatly reduce the overhead.
With that being said, spawning too many instances at once did cause frame hitches, but with a little resource management it would be possible to update what is needed in a relatively small grid. Likely this will be the choice I move forward with due to the ease of use. But, the performance isn’t what I would like. Spawning 100×100 grids caused my frames to drop to around 60 the frame it rendered. And if the goal is to load the map while moving on each client, I would likely need to drop even lower to 32×32 to prevent any hitch in frame time while loading the map.
Niagara
At first this seemed promising. GPU accelerated instances that support collision. I spun up a niagara particle system that spawned a 10x10x10 cube of cubes and added an impulse to send them in random directions up into a cone. The performance of this was amazing but I noticed some issues rendering videos on chrome tabs on my computer when I hit likely hundreds of thousands of instances. This seemed amazingly promising so the next step was adding collision.
That’s where this fell apart. Niagara did support collision, but that is on the particle and not to other actors. (To what I could find). Also accuratly spawning instances likely would have been a challenge. However I learned of a method to set a value in every instance of a material. Which I’ll link below. This would allow using a pixel map a lot like classic 2d platformers to reference sections of a material to allow 1 material to act like dozens of materials.
Procedural Mesh
This one started with a little bit of a headache. By default you can’t just add a “#include “ProceduralMeshComponent.h”” line to your C++ code to make it work. Because it’s packaged as a plugin you need to include the plugin to the project’s <ProjectName>.build.cs file. After adding the following line, I was able to work with meshes.

Oh boy, it’s been 24 hours since I wrote that last line. And I spent 8 hours learning Procedural Meshes. But I’ve seen a lot and they are very promising.
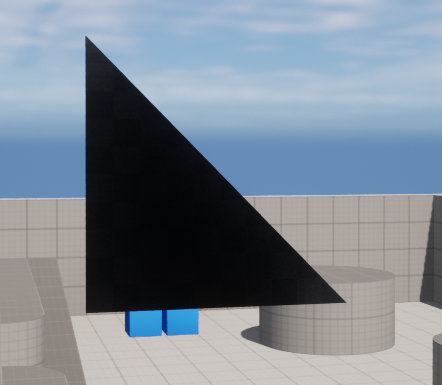
First thing to do when learning Procedural meshes is to make a triangle. This wasn’t too bad actually. With a little help from GPT 3 I got the following code.
void AWorldLoadingActor::CreateTriangleProceduralMesh(FVector Point, int32 Size)
{
	TArray<FVector> Vertices;
	Vertices.Add(FVector(Point.X, Point.Y, Point.Z));
	Vertices.Add(FVector(Point.X, Point.Y + Size, Point.Z));
	Vertices.Add(FVector(Point.X, Point.Y, Point.Z + Size));

	TArray<int32> Triangles;
	Triangles.Add(0);
	Triangles.Add(1);
	Triangles.Add(2);

	TArray<FVector2D> UV;
	UV.Add(FVector2D(0, 0));
	UV.Add(FVector2D(0, 1));
	UV.Add(FVector2D(1, 0));

	ProceduralMesh->CreateMeshSection(0, Vertices, Triangles, TArray<FVector>(), UV, TArray<FColor>(), TArray<FProcMeshTangent>(), true);
}
Be aware that you only need Vertices, Triangles, and UVs to do what we need. With this function we pass a vector into the function and it creates a triangle with the Size we pass.
If you’re following along and its the first mesh you’ve ever made in code, Congrats! But it’s just the beginning of our journey.
Now we need to make a square, because our goal is to create a grid of squares
void AWorldLoadingActor::CreateSquareProceduralMesh(FVector Point, int32 Size)
{

	// Add the vertices
	TArray<FVector> Vertices;
	Vertices.Add(FVector(Point.X+(-Size/2), Point.Y+(-Size / 2), Point.Z)); //-50,-50,0
	Vertices.Add(FVector(Point.X+(-Size / 2), Point.Y+(Size / 2), Point.Z)); //-50,50,0
	Vertices.Add(FVector(Point.X+(Size / 2), Point.Y+(Size / 2), Point.Z)); //50,50,0
	Vertices.Add(FVector(Point.X+(Size / 2), Point.Y+(-Size / 2), Point.Z)); //50,-50,0

	// Add the triangles
	TArray<int32> Triangles;
	Triangles.Add(0);
	Triangles.Add(1);
	Triangles.Add(2);
	Triangles.Add(2);
	Triangles.Add(3);
	Triangles.Add(0);

	TArray<FVector2D> UV;
	UV.Add(FVector2D(0, 0));
	UV.Add(FVector2D(0, 1));
	UV.Add(FVector2D(1, 1));
	UV.Add(FVector2D(1, 0));

	TArray<FProcMeshTangent> Tangents;

	TArray<FVector> Normals;

	TArray<FColor> VertexColors;

	// Set the procedural mesh's vertices and triangles
	ProceduralMesh->CreateMeshSection(0, Vertices, Triangles, Normals, UV, VertexColors, Tangents, true);
}
With that code we successfully made a square! I also changed the coordinates to make it flat on the ground since all the other tests are a flat plain of squares.
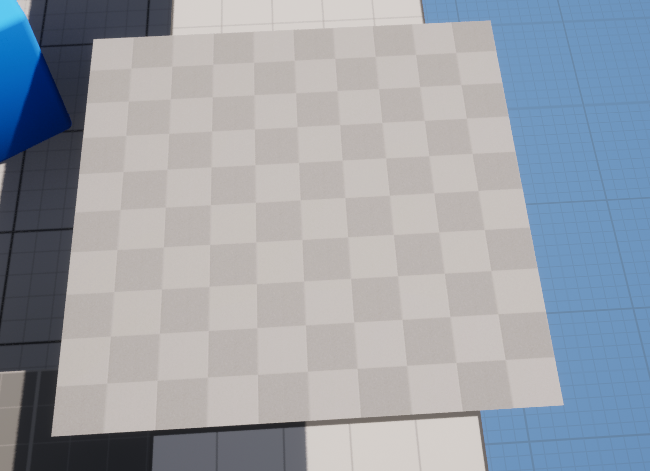
We have now made a square! I feel like we’re 75% done with this journey!
Now lets make an array of squares!
void AWorldLoadingActor::CreateSquareArrayProceduralMesh(const TArray<FVector>& Points, int32 Size)
{

	int32 halfSize = Size / 2;
	for (int i = 0; i < Points.Num(); i++)
	{
		TArray<FVector> Vertices;
		Vertices.Add(FVector(Points[i]) + FVector(-halfSize, -halfSize, 0)); //-50,-50,0
		Vertices.Add(FVector(Points[i]) + FVector(-halfSize, halfSize, 0)); //-50,50,0
		Vertices.Add(FVector(Points[i]) + FVector(halfSize, halfSize, 0)); //50,50,0
		Vertices.Add(FVector(Points[i]) + FVector(halfSize, -halfSize, 0)); //50,-50,0

		// Add the triangles
		TArray<int32> Triangles;
		Triangles.Add(0);
		Triangles.Add(1);
		Triangles.Add(2);
		Triangles.Add(2);
		Triangles.Add(3);
		Triangles.Add(0);

		TArray<FVector2D> UV;
		UV.Add(FVector2D(0, 0));
		UV.Add(FVector2D(0, 1));
		UV.Add(FVector2D(1, 1));
		UV.Add(FVector2D(1, 0));

		TArray<FProcMeshTangent> Tangents;

		TArray<FVector> Normals;

		TArray<FColor> VertexColors;

		// Set the procedural mesh's vertices and triangles
		ProceduralMesh->CreateMeshSection(i, Vertices, Triangles, Normals, UV, VertexColors, Tangents, true);
	}
	ProceduralMesh->SetCastShadow(false);
}
If generating a square works, why not just generate a bunch of squares? That makes sense to me.
It was at this moment I was around 5 hours in and I thought to myself. Well that was a waste of time. HISMs really aren’t looking too bad. I will have to dial things back quite a bit, but HISMs don’t kill my performance to look at it. and I’m getting SIGNIFIGANTLY less performance from this much more simplistic method of rendering squares.
But I couldn’t give up after putting that much time in. My first thought was, “I wonder if I can call CreateMeshSection() less?”
void AWorldLoadingActor::CreateSquareArrayProceduralMeshOriginal(const TArray<FVector>& Points, int32 Size, bool CreateCollision, UMaterial* Material)
{

	TArray<FVector> Vertices;
	TArray<int32> Triangles;
	TArray<FVector2D> UV;
	ProceduralMesh->SetMaterial(0, Material);


	ProceduralMesh->SetCastShadow(false);
	int32 halfSize = Size / 2;
	for (int i = 0; i < Points.Num(); i++)
	{
		Vertices.Add(FVector(Points[i]) + FVector(-halfSize, -halfSize, 0)); //-50,-50,0
		Vertices.Add(FVector(Points[i]) + FVector(-halfSize, halfSize, 0)); //-50,50,0
		Vertices.Add(FVector(Points[i]) + FVector(halfSize, halfSize, 0)); //50,50,0
		Vertices.Add(FVector(Points[i]) + FVector(halfSize, -halfSize, 0)); //50,-50,0

		// Add the triangles
		Triangles.Add(0 + (i * 4));
		Triangles.Add(1 + (i * 4));
		Triangles.Add(2 + (i * 4));
		Triangles.Add(2 + (i * 4));
		Triangles.Add(3 + (i * 4));
		Triangles.Add(0 + (i * 4));

		UV.Add(FVector2D(0, 0));
		UV.Add(FVector2D(0, 1));
		UV.Add(FVector2D(1, 1));
		UV.Add(FVector2D(1, 0));

	}
	ProceduralMesh->CreateMeshSection(0, Vertices, Triangles, TArray<FVector>(), UV, TArray<FColor>(), TArray<FProcMeshTangent>(), CreateCollision);
}
In this code, we are adding every single triangle into 1 singular mesh section. One other piece is disabling shadows.
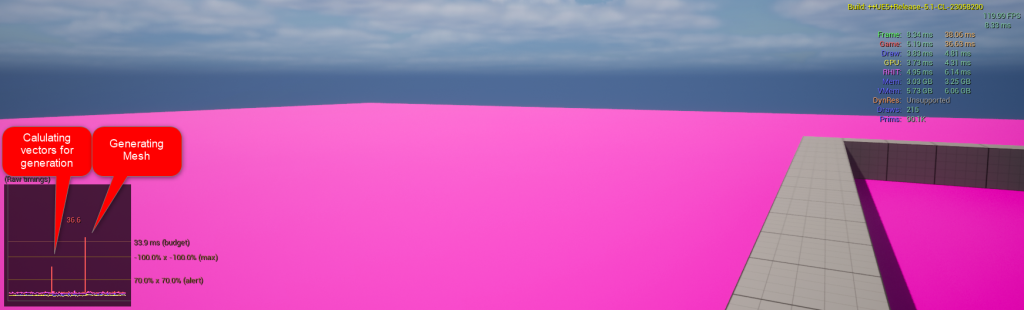
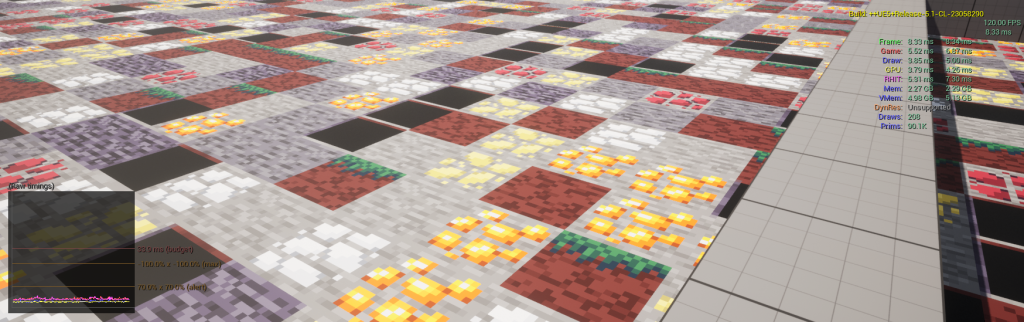
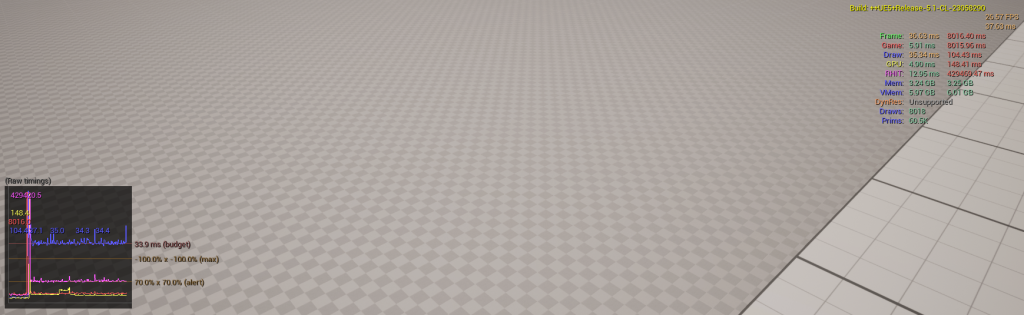
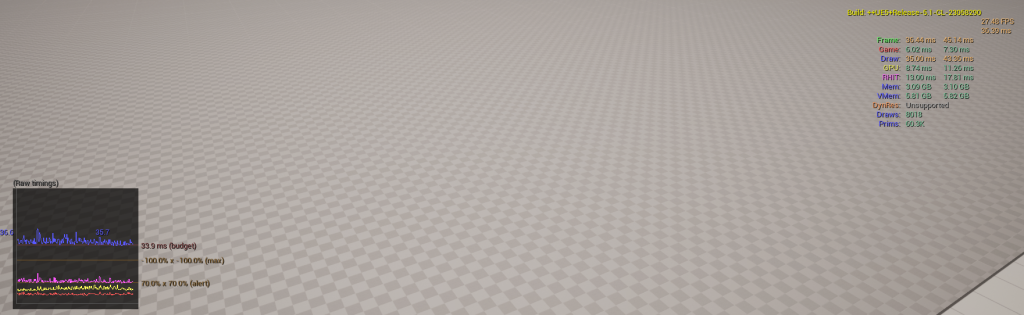
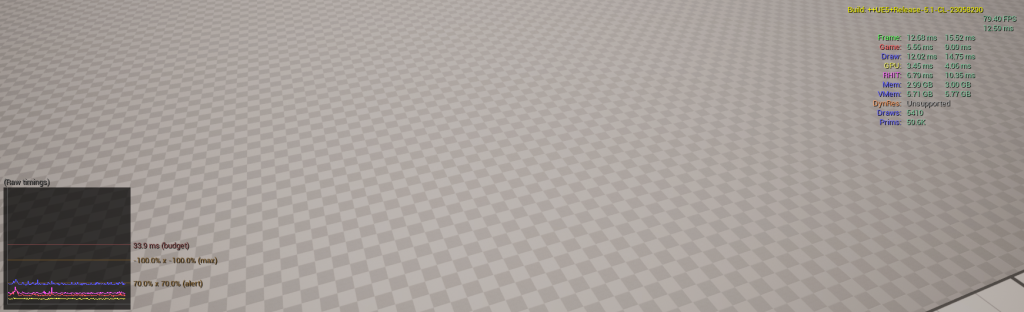
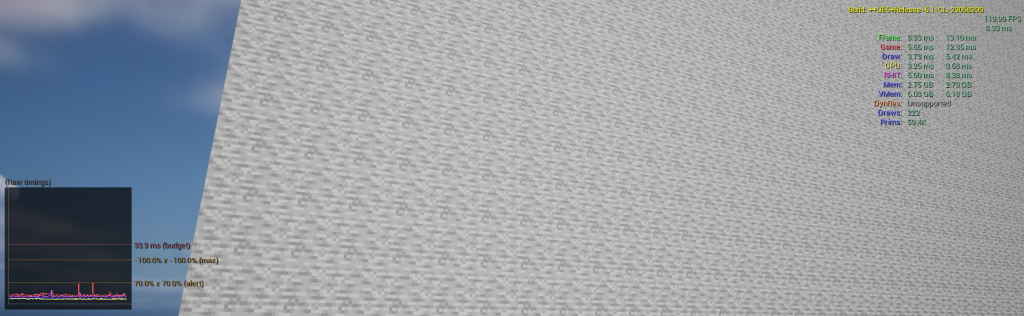
At this point I struck gold. Generating the same amount of blocks as the HISM but at (36.6-42)ms vs 137ms that is almost 25% of the time! This is amazing. It means that I can easily generate a 2d world and make it

In 2D “voxel” games, you don’t really need collision on the entire world, as players will only need collision on blocks around them. With collision disabled we got 11ms frame time to generate this massive world. This means we can use more Procedural Meshs’ as decoration or view distance without sacrificing performance on large load areas.
Tile Map
Last in our list is the humble tile map. And this one was a little interesting. First it’s beta, which by Epics words means it’s not production-ready but it’s a step beyond ‘experimental’. This is a big red flag for me, since it’s been this way for years. So you likely wont get support if you have issues.
First thing about this is it handles a lot of the work for you. Which makes it pretty convenient to use.
I did a fairly basic test for this all in BP. (looking back I can see this is wrong, and the completed line should be on the left loop. LOL)
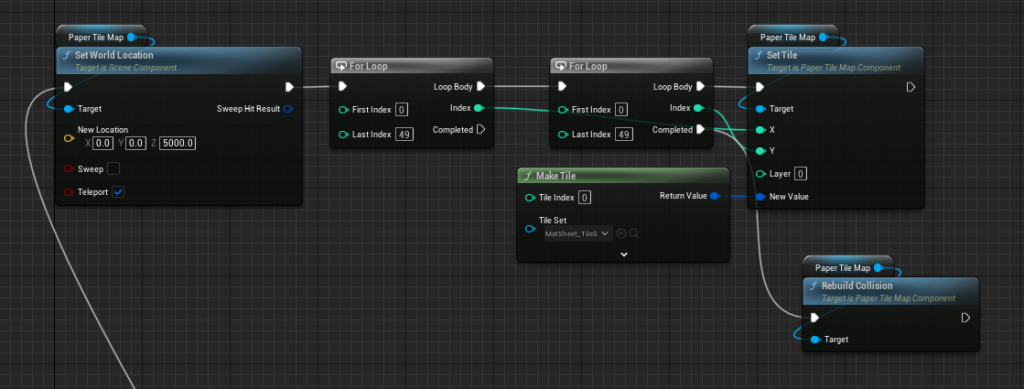
The tile map seems to be fairly great for this job as it also creates collision with depth to it. Also because the loops are done in BP, they are much slower than the C++ loops. I want to do this properly but I’m not seeing a lot of documentation on the subject. I attempted to add the plugin like I did for the procedural mesh using “PAPER2UPaperTileMapComponent” and “PaperTileMapComponent” But I couldn’t get the code to build the engine. For now, I think I’m calling this project done.